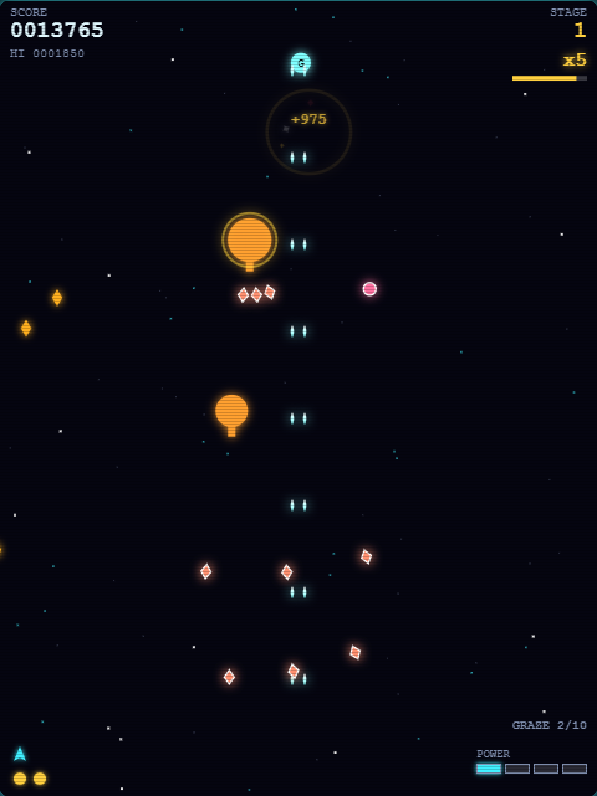
Controls and screen positioning to learn first
Move with the arrow keys or WASD, shoot with Z or Space, use a bomb with X, and hold Shift for focused movement. Normal speed is 260 px per second and focused speed is 130 px; focusing also displays the craft's white hitbox core. Collisions depend not on the wings but on the center with a 3 px radius. Trying to keep the whole craft away from bullets creates unnecessary movement, so in dense patterns, think only about carrying the white point into safe space.
A useful default position is about one quarter of the screen above the bottom. Staying at the very edge gives bullets less time to leave the screen and removes the option to escape downward when pressed from either side. Moving too far up instead reduces reaction time to enemies and timed projectiles. Stay near the horizontal center, move toward an enemy's entry side to fire, then return. This movement between positions supports both offense and evasion.
Read bullet patterns as flows, not points
Guide aimed bullets with small movements
Aimed spreads from enemies such as turret and weaver expand around your position when fired. Crossing the screen for every volley makes old and new rows intersect, removing escape routes. Instead, guide them by moving gradually from the center toward one side, then reverse after a row passes. Use normal movement for broad positioning and Shift for fine adjustment once between bullets.
Respond early to warnings and timed projectiles
A sniper stops near the top, flashes for 0.6 seconds, then fires three fast shots. Begin moving one way when the flashing starts and return after the shots to avoid crossing lines. A bomber's orb and a miner's mine flash faster as their timers run down, then create multiple bullets on detonation. Do not approach just before they trigger. While the flashing is still slow, give up an entire area, such as the right side.
Do not track circular bullets individually; see the space between two adjacent lines as a corridor. In rotating patterns, the corridor moves sideways as well, so place the white core in its center and follow at the same speed for a few seconds. If the exit narrows, use a bomb instead of holding on to the last moment.
Build score through grazing and combos
A bullet passing within 14 px of your center awards 50 points if it has not already been grazed and you are not invincible. The same bullet cannot score repeatedly. Rather than leaving safety for danger, use focused movement to approach the edge of a bullet row you can already evade by a few pixels. If there is no visible route after the graze, preserve the life instead of taking 50 points.
Each defeated enemy raises the combo by one, up to a 16-times multiplier. Every defeat resets the window to two seconds, so defeating one small enemy while concentrating on a durable target helps maintain it. Practice in this order.
- First make four consecutive defeats consistent, leaving time to read the combo display on the HUD.
- Deal with an enemy drifting toward the edge first, then defeat one in the center within two seconds.
- Against drone formations, fire from the center outward and limit lateral movement to secure consecutive defeats.
- At eight times and above, avoid forced pursuit and let the multiplier go if evasion is beginning to fail.
At the end of a stage, you receive defeats multiplied by 50 and grazes multiplied by 20, plus a no-miss bonus of 10,000 multiplied by the stage number. On Stage 1, avoiding one hit is worth 10,000 points. Preserving a no-miss run is therefore often worth more than a few immediate grazes.
Use bombs before failure, not after it
You begin with two bombs. Activating one grants three seconds of invincibility, clears enemy bullets on screen, and deals 60 damage to all enemies and the boss. Taking a hit restores the bomb count to at least two, but also costs a life and power, so it is not a favorable trade for replenishment. B items can raise the stock to six.
The timing is roughly half a second before the core has no route out. Press when you are forced to an edge and can see that the next spread will overlap. Against a boss, keeping one or two bombs for the dense final phase is more repeatable than spending them at the opening only for HP damage. To reduce unused bombs at death, identify one warning after each hit that should have prompted a bomb. Stating it plainly builds a usable decision rule.
Priorities by stage
Stage 1: Learn the four basic types and large enemies
The opening centers on dart, sine, orbiter, and turret, with tank and carrier joining later. Defeat fast darts first and guide turret spreads with small movements. Reducing nearby small enemies before entering a tank's circular pattern makes its corridors easier to read.
Stages 2 and 3: Watch warnings and placed hazards
Stage 2 adds weaver and sniper, while Stage 3 adds splitter and bomber. Give the sniper's flashing first attention, and treat the darts created on both sides of a defeated splitter as part of the same threat. Give up the side holding a bomber orb early and fight in the open half.
Stage 4 onward: Choose targets
Aegis and miner join, after which the full roster appears. An aegis halves incoming damage while above half HP, so if it cannot be removed quickly, deal with sniper or miner first. Enemy HP, bullet speed, and firing frequency increase through Stage 8. At higher stages, pursue enemies near the top less often and preserve time to read warnings from the lower center.
A practice plan for each run
- Run 1: Ignore the score and practice switching from normal to focused movement more often.
- Run 2: Graze only straight bullet rows and aim for a no-miss run.
- Run 3: Use a four-hit combo as the starting point and find the next enemy within two seconds.
- Run 4: Use at least one bomb before taking a hit, and remember the warning that prompted it.
Following several goals at once can cause a run to fail without revealing why. Limit each run to one observation, and you can improve evasion accuracy separately from scoring decisions.
Related links
About this article
Written by rin0420, the developer of the games and tools published on this site. The screenshots and figures shown here were captured from the live versions by using them directly.
Published July 14, 2026 / Last updated July 25, 2026 (screenshots added)