NEON WRAITH GUIDE
NEON WRAITH Guide: Early Builds and Survival Priorities
Because attacks are automatic, your route and upgrade order decide the outcome. This guide explains how to stabilize the opening and progress naturally toward weapon evolution.
NEON WRAITH is a survival action game in which you repel mechanical life-forms approaching from every direction, collect XP, and choose one of three upgrades at each level. There is no attack input; your direct decisions are mainly where to move and what to develop. Choosing a position that still offers an escape route ten seconds later matters more than defeating the enemy immediately in front of you.
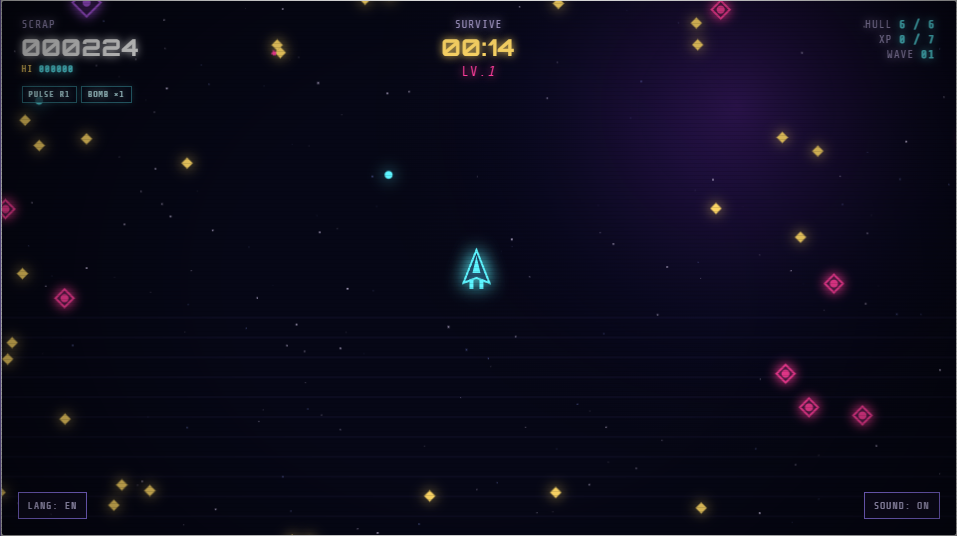
Your first goal is more room to move, not more damage
With few enemies early on, stacking damage alone can appear to work. Once their density rises, however, nearby enemies may remain alive and force you into dangerous areas to collect XP. On an initial run, first prepare for close threats and create room to move.
- Start near the center of the screen and move slowly away from the more crowded side.
- Turn before reaching the outer edge, drawing the enemy group into a broad arc.
- Pass through the thinner area left by defeated enemies and collect the clustered XP.
Short movements back and forth scatter enemies across several directions, making the next safe area harder to read. Guide them one way along a wide circle to create a collection route behind you. Do not stay directly against the outer edge, though: if the way ahead closes, half your escape options are gone. Leave one or two craft widths of space inside the boundary.
Check an early build against three roles
Even when every option sounds strong, choosing only one kind of role leaves a weakness. Early on, check whether these three slots are covered.
- Close-range safety: A weapon such as ORBITAL BLADES that handles nearby enemies.
- Room to act: An element such as CHRONO FIELD that delays being surrounded.
- Sustained fundamentals: A support device such as REACTOR CORE that contributes throughout the battle.
The game page also presents these three as a beginner-friendly combination. The names themselves are not the point; you need one answer each for enemies getting close, a crowd growing dense, and a fight running long. When the desired equipment does not appear, avoid overlapping roles and prioritize covering your current weakness.
Focus on one equipment evolution
The game has eight weapon and support-device lines, plus four EVOLUTION forms triggered by specific combinations. Each evolution has a corresponding pair, such as PHOTON PULSE and NOVA ARC. Chasing several evolutions from the opening spreads growth across too many items and extends the weak period before any is complete.
Once you find a comfortable primary weapon, use its line as the basis for one evolution target. If the required item is absent from the three choices, there is no need to abandon survival support. Prioritize removing an immediate fatal weakness, strengthening your main weapon, and then advancing the evolution condition. Evolution is a powerful destination, but the build must survive long enough to reach it. The weapon guide below the game provides the current combination table for that play session.
Collect XP when it is safe, not the moment it drops
Visible XP invites the shortest route, but crossing an enemy group to collect it causes damage. First draw enemies in one direction and thin the edge of the group. A safe route has two or three craft widths of space ahead and enough room to turn beyond it. If it is a dead end, leave the XP for the next circuit.
At the level-up screen, take a brief inventory of your equipment. Decide first whether you lack close-range control, broad-area clearing, or room to move, and the choices become easier to assess. Wide-area options such as NOVA ARC and MINE LATTICE also help create collection routes once enemy numbers rise in the middle game.
Use VOID BOMB one step before the encirclement closes
VOID BOMB is more reliable when it is not reserved solely as a last resort after a full encirclement. The warning sign is the moment enemies fill both the path ahead and the inner side, beginning to press you toward the boundary. Used then, the cleared space lets you return toward the center. Wait until just before impact and there may still be no exit afterward, allowing the same area to close around you again.
Because bombs can be replenished, clearing a dangerous formation early and rebuilding your route is more useful than dying with one unused. Immediately after a bomb, do not head straight for XP. Move first toward the less crowded side and establish the next circuit.
Test one thing per sortie
The three sectors have distinct enemies and a final GUARDIAN, while the more difficult OVERDRIVE unlocks after clearing Stage 1. You do not need an answer for every element on the first attempt. After each sortie, review just one point: how often you were pushed to the edge, whether you died with a bomb remaining, or whether you spread equipment too widely before evolving it. High scores, sortie counts, defeats, and other results are stored in the browser, so you can compare runs as you improve.
Consistency comes not from conspicuous damage, but from gathering enemies in one direction, collecting only the XP you need, and breaking up formations with a bomb before they become dangerous. Maintain that flow and the opening depends less on the luck of the upgrade choices.
Related links
- About NEON WRAITH
- Play NEON WRAITH and view the weapon table
- Development note: Thoughts on tuning shooter difficulty
About this article
Written by rin0420, the developer of the games and tools published on this site. The screenshots and figures shown here were captured from the live versions by using them directly.
Published July 14, 2026 / Last updated July 25, 2026 (screenshots added)